Autotuning has become a conspicuous feature of voice recordings in modern music. With the rise of sound engineering, the software tools available to music producers have expanded, and audio software programs like Adobe Audition have become increasingly popular in recording studios worldwide.

What is autotuning?

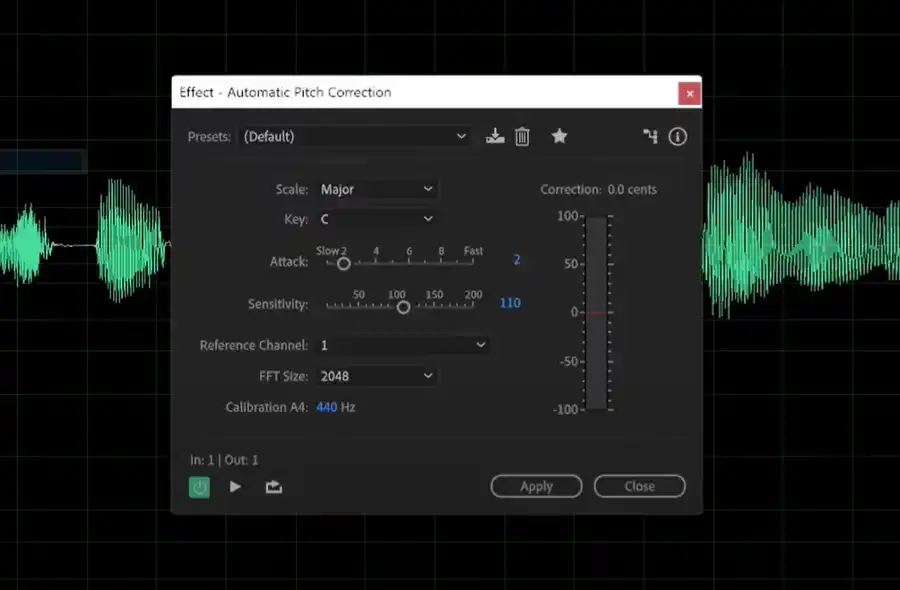
Autotune can be used in two ways when recording vocals: to correct vocal imperfections or to create a distinguishable autotune sound. The correct term for Autotune in Adobe Audition is “Automatic Pitch Correction.” You can find the pitch correction effect in the Effects menu under Time and Pitch.
Adobe Audition comes with several presets for the effect, including Subtle Vocal Correction and Extreme Correction. Experimenting with the settings is key to getting the perfect sound. Adobe Audition supports non-destructive editing, so you can always go back and adjust the effect later if needed.
If you're looking to autotune your vocals with Adobe Audition without using any plugins, you're in luck. The software comes loaded with a built-in feature for Autotune.
How to autotune using Automatic Pitch Correction
- First, open Audition.
- Then, select your audio track and access the “Effects” tab at the top.
- Once you're there, find the “Pitch Correction” effect in the Time and Pitch menu.
From there on, you can control the effect's parameters. You can change the key, calibration, and attack as well as the sensitivity of the effect to get the type of autotune you want.
By default, Adobe Audition selects the Chromatic scale, but you can adjust the settings to fit your desired key. If you're looking for more natural-sounding autotune, choose the Subtle Vocal Correction preset. If you want a more extreme effect, you should go for the Extreme Correction preset.
It’s worth noting that Audition's sister program, Premiere Pro, offers a wide range of audio presets for dialogue, noise reduction, and different microphone types. This means that even if you're not an expert in sound design, you can still achieve professional-quality audio with relative ease.
Autotune in Adobe Audition using plugins
Step 1: Start by downloading the Auto-Tunes you want to use.
Step 2: Once the download is complete, close any open Adobe Audition windows.
Step 3: Double-click on the Auto-Tune EXE file you just downloaded. The installation process will begin. Follow the instructions provided on the screen.
Step 4: Double-click the “Computer” icon on your desktop. If you’re using Windows 8, click on the “File Explorer” button on the taskbar and locate the “C:” drive. Afterward, click on “Program Files,” and then “VSTPlugins.” Make sure that the Auto-Tunes file is present here after running the EXE file.
Step 5: Launch Adobe Audition and navigate to the “Effects” tab, then select “Refresh Effects Lists.” A pop-up box will appear displaying the VST plug-ins that you have installed on your computer. By default, Auto-Tune should be checked. If it isn’t, check the box next to Auto-Tunes, and then click “OK.”
Step 6: Now that you’ve refreshed the effects list, it’s time to launch the Auto-Tune plugin. Click the “Multi-track” button located at the upper-left corner of the window, then select the “FX” button on the “Track Controls” palette. Click the effects selection drop-down box, select “VST,” and then click Auto-Tunes to launch the plugin.
Questions you might be asking
Is Adobe Audition autotune good?
Yes, Adobe Audition autotune is a reliable and efficient tool for pitch correction in audio files. It can help fix the intonation of your vocals and make them sound more polished and professional.
How do you use automatic pitch correction in Audition?
To use automatic pitch correction in Adobe Audition, you need to first select the track you want to edit. Then go to the "Effects" tab and select "Automatic Pitch Correction." This will open a window where you can adjust the settings for the pitch correction, such as the amount and speed. Once you're satisfied with the settings, simply hit "Apply" and Adobe Audition will automatically apply the pitch correction to the track.
How do I import audio effects into Adobe Audition?
To import audio effects into Adobe Audition, you first need to download the effect you want and save it to your computer. Then, in Adobe Audition, go to the "Effects" tab and select "Import/Export Effects Presets." This will open a window where you can select the effect file you downloaded and import it into Adobe Audition. Once imported, the effect will be available for you to use in your audio editing projects.
How do I make my singing sound better in Adobe Audition?
There are several ways to make your singing sound better in Adobe Audition. One way is to use the automatic pitch correction tool, as mentioned earlier. Another way is to use the EQ (equalizer) tool to adjust the levels of different frequencies in your vocals. You can also add reverb or other effects to give your vocals more depth and dimension. Finally, make sure you're recording in a quiet space with proper microphone technique to ensure the highest quality recording possible.

