
In this tutorial, you'll learn how to change the eye color of your subject using Photoshop's Hue/Saturation adjustment layer. You don't need to be a professional photographer to make this change, and you won't have to make any permanent changes to the original image.

Step 1: Use Lasso Tool
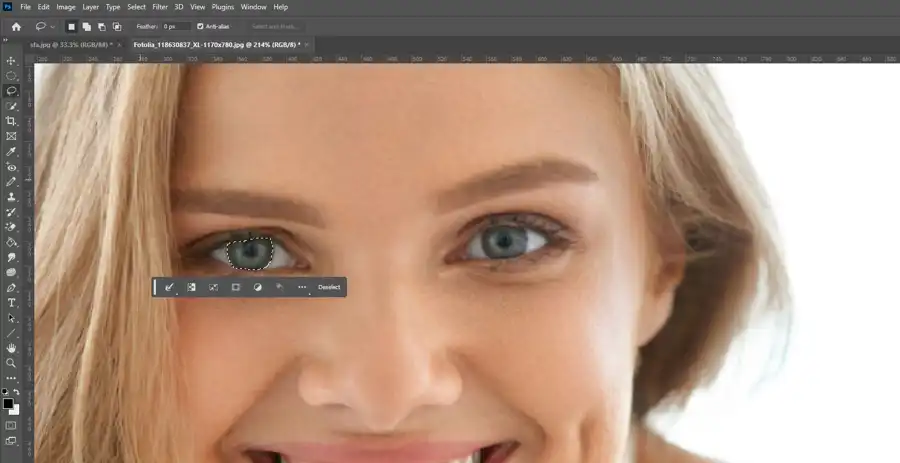
To get started, open your image in Photoshop and zoom in on the subject's eyes. The closer you get, the easier it will be to make precise selections. Once you're zoomed in, choose the Lasso tool from the toolbar on the left-hand side of Photoshop.
With the Lasso tool, draw around the iris of the eye you want to change. Be careful not to select any other parts of the eye or the photo. Once you've drawn completely around the iris, release the mouse button, and you'll see the selection highlighted with a moving dashed line.
Step 2: Hue/Saturation
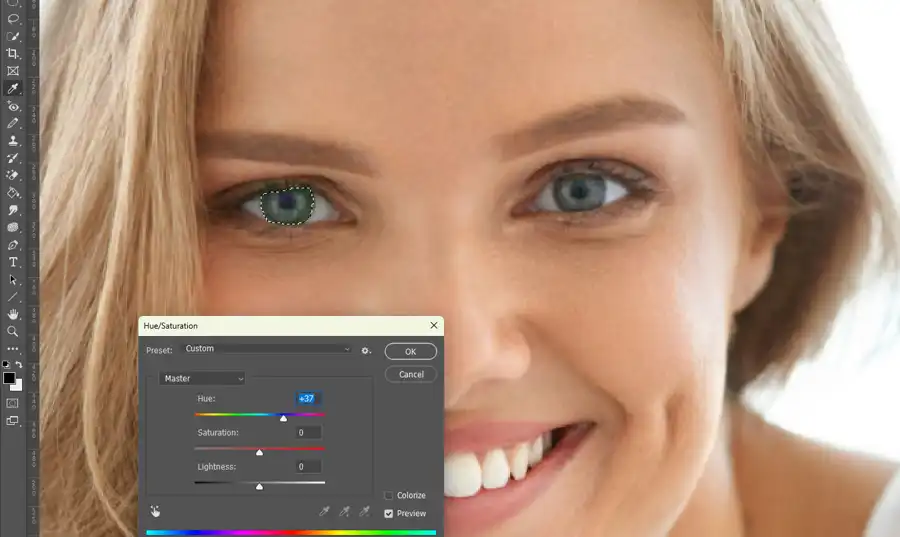
Now that you've made your selection, it's time to add the Hue/Saturation adjustment layer. Click on the adjustments panel on the right-hand side of Photoshop and select Hue/Saturation from the menu. You'll see a new layer appear in your Layers panel.
To change the eye color, move the Hue slider left or right. You'll notice that as you move the slider, the color of the iris changes. Keep adjusting the Hue slider until you find the color you want. Use the Saturation slider to adjust the vibrancy of the new color. You'll want to lower the saturation of the new color to mimic the look of a natural eye.
Step 3: Blend Mode
Next, change the Blend Mode to Color. This step is critical to making sure the new eye color blends seamlessly with the rest of the image. If you notice any areas where the new color looks too harsh or unnatural, use the layer mask to paint over those areas with a soft brush until it looks just right.
Now that you've mastered the basics of changing eye color in Photoshop, it's time to take your portrait photography edits to the next level with some creative ideas. Experiment with different editing techniques such as smoothing out wrinkles and blemishes on the skin or playing with gradients to create stunning effects. Try overlaying landscape photos on top of your portraits to create a double exposure that adds an ethereal quality to your images.
In conclusion, changing eye color in Photoshop is a straightforward process that can significantly enhance your portrait photography. With Hue/Saturation adjustment layer, you can experiment with different colors and vibrancies to create your desired effect. Coupled with creative ideas and additional Photoshop tools, you can take your images to the next level.
Questions you might be asking
How do you change eye color in Photoshop?
To change eye color in Photoshop, follow these simple steps:
- Open the image in Photoshop.
- Select the Lasso tool from the toolbar.
- Use the Lasso tool to carefully select the area around the eye.
- Click on the Adjustment Layer icon at the bottom of the Layers panel and select Hue/Saturation.
- Use the slider to adjust the Hue to the desired color.
- You can also adjust the saturation and lightness for a more natural look.
- Once you're satisfied, save the image.
How do I change my eye color in Photoshop for free?
To change your eye color in Photoshop for free, follow these steps:
- Download GIMP, a free and open-source image editing software.
- Open the image in GIMP.
- Select the Fuzzy Select tool from the toolbar.
- Click on the area around the eye you want to change.
- Go to Colors > Hue-Saturation from the menu.
- Use the sliders to adjust the Hue to the desired color.
- You can also adjust the saturation and lightness for a more natural look.
- Once you're satisfied, save the image.
How do you change someone's eye in Photoshop?
To change someone's eye color in Photoshop, follow these steps:
- Open the image in Photoshop.
- Select the Lasso tool from the toolbar.
- Carefully select the area around the eye you want to change.
- Click on the Adjustment Layer icon at the bottom of the Layers panel and select Hue/Saturation.
- Use the slider to adjust the Hue to the desired color.
- You can also adjust the saturation and lightness for a more natural look.
- Create a Layer Mask and invert it so the color change only applies to the selected area.
- Once you're satisfied, save the image.
How can I change my eye color?
Outside of editing software, you can change your eye color by wearing colored contact lenses or undergoing surgical procedures. However, changing your eye color in editing software is a non-invasive and cheaper alternative. Simply follow the steps provided above on how to change your eye color in either Photoshop or GIMP. Remember, editing software only changes the appearance of the eye in the image, and does not actually change the color of your eyes in real life.