
Adjusting the tonality and color of your image can make a huge difference in how it is perceived. Thankfully, Photoshop has a range of tools in the Adjustments panel that can help you achieve the desired effect.

Levels and Curves
The Levels and Curves adjustments are two of the most powerful tools for changing the tonality and color of an image. Levels will give you basic control over the overall tonality and color, while Curves provides greater control over highlights, midtones, and shadows. Keep these in mind when you're looking to make tonality and color adjustments.
If you need to adjust the specific colors in your image, you can use Color Balance or Hue/Saturation. Color Balance helps you adjust the overall color balance of your image, while Hue/Saturation allows you to adjust individual colors' hue, saturation, and lightness.
Black & White
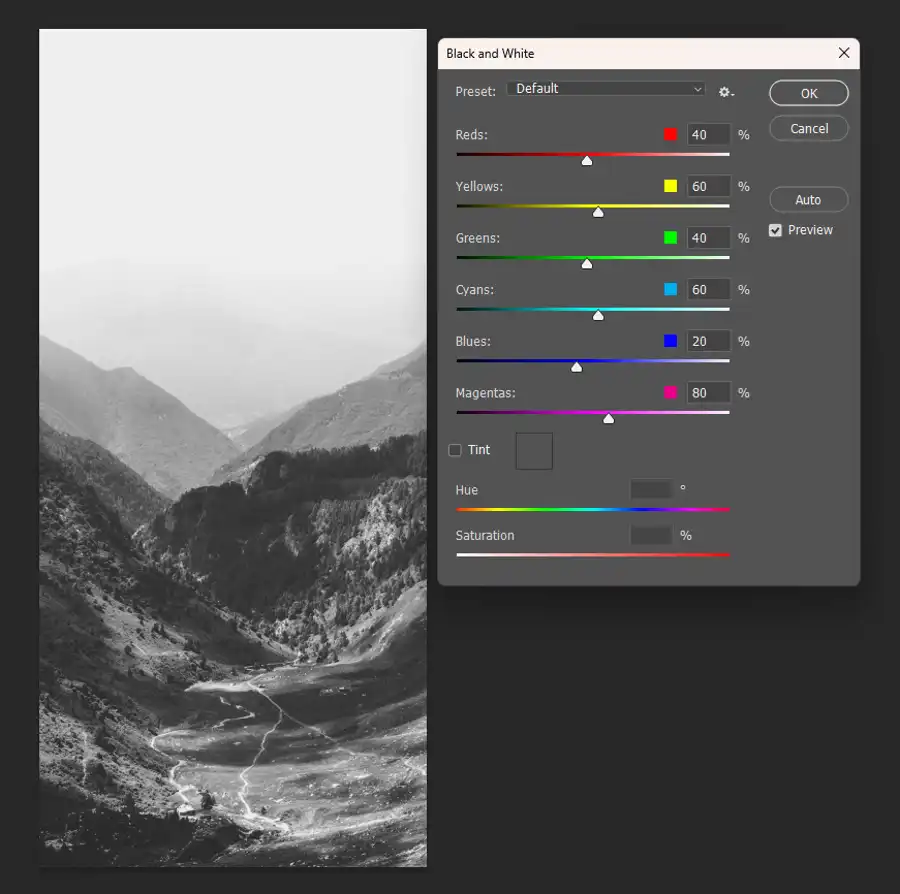
Another useful adjustment in the panel is Black & White, which allows you to quickly convert a color image to black and white. With these tools in the Adjustments panel, you can easily make the necessary changes to your image to achieve the desired result.
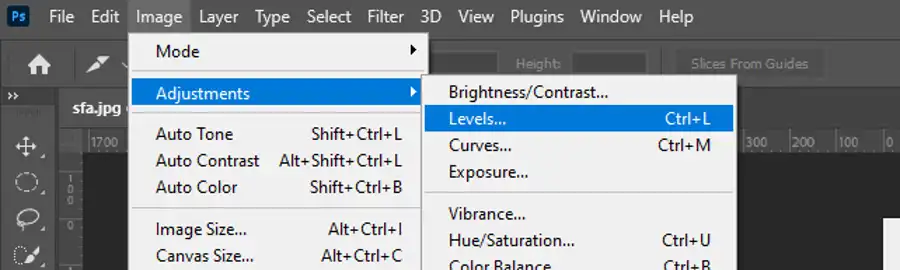
Now that you know the basics of adjusting tonality and color, let's dive into a more in-depth tutorial on how to use Photoshop's Levels command to correct color issues in your images.
How to color correct in PS?
- First, set up the Levels defaults by selecting Levels from the Adjustments panel. This will bring up the Levels dialog box.
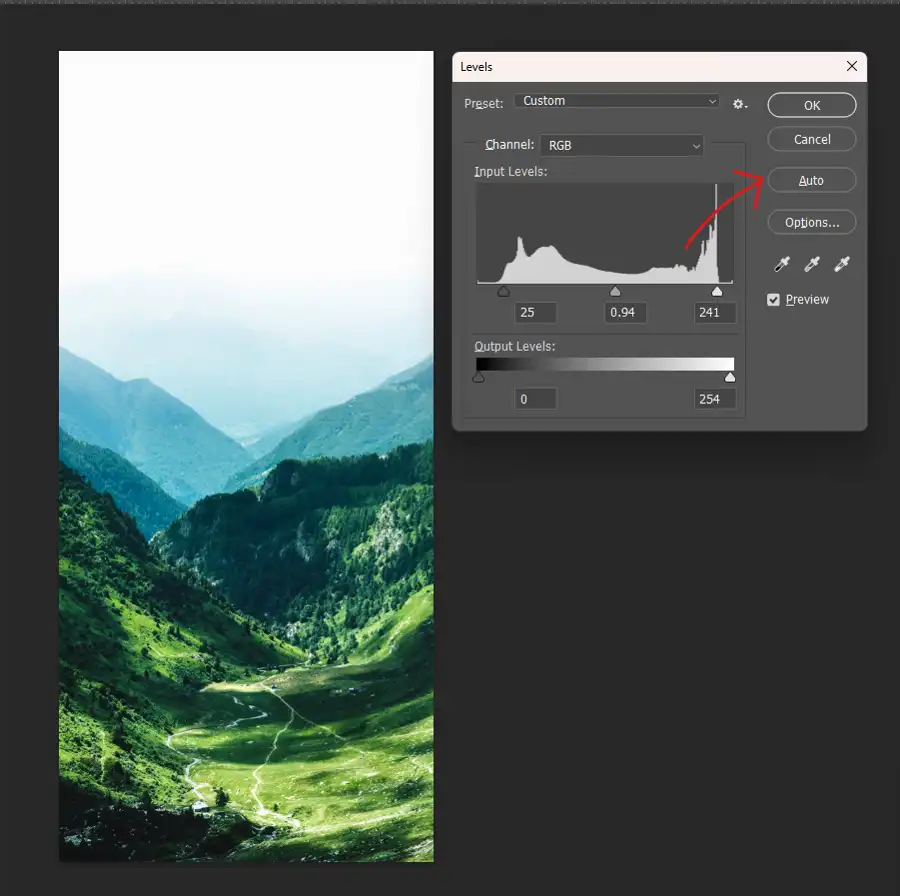
- Click on the Auto button and select Auto Levels. This will help us set a baseline adjustment for our image.
- Next, add a "Threshold" adjustment layer by clicking on the New Adjustment Layer icon at the bottom of the Layers palette.
- From the menu that appears, select Threshold. The Threshold adjustment layer is used to find the lightest and darkest areas of the image, which we will need for our color correction.
- Once the Threshold adjustment layer is in place, find the lightest part of the image by adjusting the slider until only the brightest areas are visible. Place a target marker inside a white area by clicking on the Eyedropper icon and then clicking on the Color Sampler icon. Repeat the same process to find the darkest part of the image and place a target marker inside a black area.
- With the target markers in place, remove the Threshold Adjustment layer and add a Levels Adjustment layer. Click on the first target marker with the white point eyedropper and then click on the second target marker with the black point eyedropper. This will set the white and black points of the image.
- If needed, adjust the center slider to brighten the midtones. Once you're satisfied with the adjustment, you can remove the target markers.
This process can seem daunting, but it's essential to take the time to make these corrections on your images. The final result will be worth the effort.
Auto color correction in Photoshop
If you're looking for a quick fix method for color correction in Photoshop, there is an alternative technique that might be of interest. By choosing the Auto option in the Levels or Curves adjustment layers, you can access the Auto Color Correction Options. Select the option to Find Dark & Light Colors and turn on the Snap Neutral Midtones section. Photoshop will then analyze the image and correct the colors, providing a quick way to correct a large number of photos all at once. This technique can be recorded as an Action in Photoshop for future use, making it even more efficient.
In summary, adjusting tonality and color in Photoshop can seem like a daunting task, but it's essential for creating high-quality images. If you take the time to learn Photoshop's Adjustment panel and use techniques like the Levels command, you'll be well on your way to mastering color correction in your images.
Questions you might be asking
How do I color correct a single layer in Photoshop?
To color correct a single layer in Photoshop, you can use adjustment layers. Simply click on the "Create new fill or adjustment layer" button at the bottom of the Layers panel and choose the "Curves" or "Color Balance" adjustment. Make sure the adjustment layer is clipped to the layer you want to color correct by clicking on the "Create Clipping Mask" button in the Layers panel. Then use the adjustment layer's controls to adjust the color and tone of the layer.
How do I get auto color correction in Photoshop?
To get auto color correction in Photoshop, go to the "Image" menu and choose "Auto Tone," "Auto Contrast," or "Auto Color." Photoshop will automatically adjust the color and tone of the image based on its analysis. Alternatively, you can use the "Auto" options in the Curves, Levels, and Color Balance adjustments to apply automatic color correction.
How do I color correct an image?
To color correct an image in Photoshop, you can use several different adjustment layers. Some of the most commonly used adjustment layers for color correction include Curves, Levels, Color Balance, and Hue/Saturation. You can also use the Color Replacement Tool to change specific colors in the image. Make sure to use adjustment layers or non-destructive editing techniques to avoid permanently altering the original image.
How do I auto correct in Photoshop?
To auto correct in Photoshop, you can use the "Auto" options in the Curves, Levels, and Color Balance adjustments. You can also use the "Auto Tone," "Auto Contrast," or "Auto Color" options in the Image menu. Alternatively, you can use the "Auto Smart Tone" option in the Camera Raw filter to apply automatic adjustments to the image. Keep in mind that automatic correction options may not always produce the desired results and may need to be fine-tuned manually.