
Photoshop, an indispensable tool in the realm of photo editing, offers an arsenal of features that can truly bring your images to life. Among these features is the ability to color match – a technique that can help blend images seamlessly, improve consistency, and enhance the overall quality of your design.
In this comprehensive guide, we'll explore how to effectively color match in Photoshop, taking you step-by-step through this powerful tool to help you master this crucial skill.

Understanding Color Matching
Before we delve into the actual process, it's important to understand what color matching is. Color matching involves adjusting the colors in one image (or part of an image) to mirror the colors in another. This can be particularly useful in composite images, where elements from multiple sources are combined into a single picture. By ensuring that colors are consistent across the entire image, you can make your composites more realistic and visually pleasing.
Prerequisites
Ensure you have Adobe Photoshop installed on your computer. For this tutorial, we'll be using Photoshop 2023, but the steps will be similar in other recent versions. Also, open the images you want to work with in Photoshop.
Now, let's dive in!
Step 1: Analyze Your Images
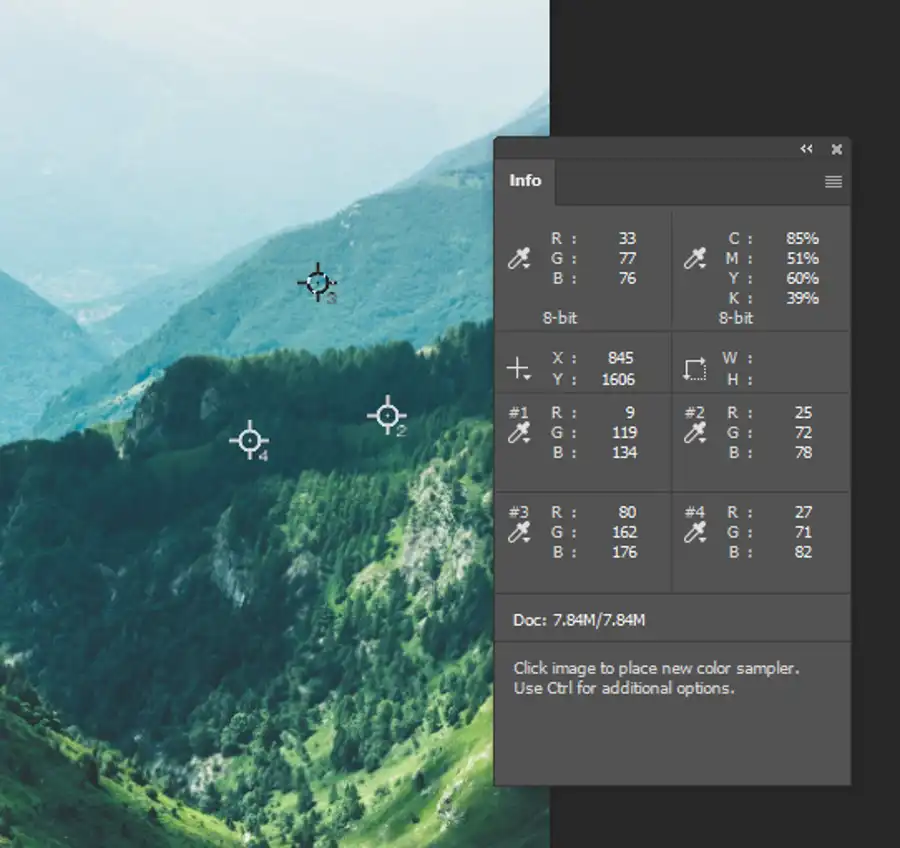
The first step in color matching is to examine your images closely. Identify the source and target image. The source image is the one whose color you want to match, and the target image is the one you'll be adjusting to match the source's color.

Step 2: Match Color Command
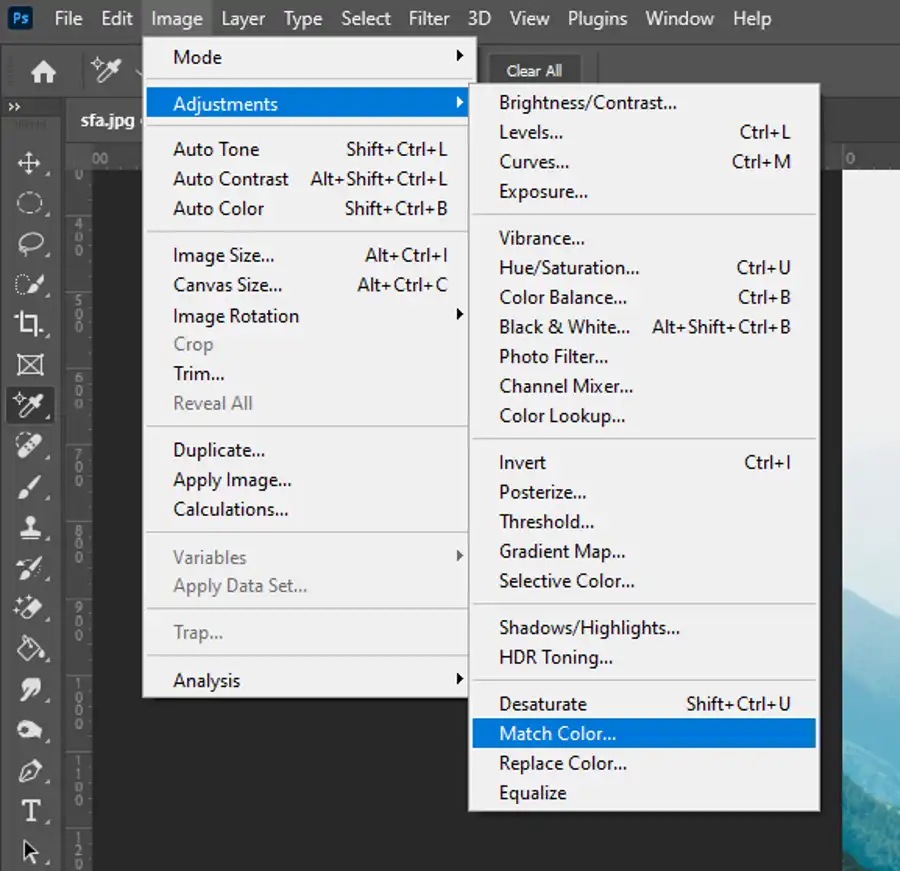
- Open the target image (the one you'll be adjusting) and go to
Image > Adjustments > Match Color. - In the
Match Colordialog box, you'll see the 'Source' and 'Layer' dropdown menus. From the 'Source' menu, select the file that contains your source image. If your source image has multiple layers, select the specific layer you're matching from the 'Layer' dropdown menu.
You'll also notice the 'Luminance', 'Color Intensity', and 'Fade' sliders. Adjust these according to your needs. 'Luminance' adjusts the brightness, 'Color Intensity' manages the color saturation, and 'Fade' controls the strength of the color matching effect.
Experiment with these settings until you're happy with the color match. If it's not working, don't worry. Just hit 'Cancel' and you can start over.

Step 3: Fine-tune Your Image

After initial color matching, you might still need to make some adjustments to get it just right. Here are some extra tools that you can use:
- Levels and Curves: These tools, found under
Image > Adjustments > Levels(orCurves), can help to adjust the image's overall tone. - Hue/Saturation: This can be found under
Image > Adjustments > Hue/Saturationand it allows you to adjust the overall color and saturation of the image. - Selective Color: Found under
Image > Adjustments > Selective Color, this tool allows you to adjust individual colors in the image.
Step 4: Save Your Image
Once you're satisfied with the color matching, remember to save your work. Go to File > Save As, name your file, select the file type, and choose your desired location to store it.

Troubleshooting Tips
Color matching can be a tricky process and it may not always go according to plan. Here are some quick tips to help you get it right:
- Use Good Quality Images: The better the quality of your images, the easier it will be to match colors accurately.
- Pay Attention to Light and Shadow: Try to match images that have similar lighting conditions, as this will make the process easier and the results more realistic.
- Practice Makes Perfect: Don't be discouraged if your first attempts aren't perfect. The more you practice, the better you'll get at color matching.
Conclusion
Mastering color matching in Photoshop can greatly improve the quality of your composite images, designs, and photo editing projects. By following the steps and tips outlined in this guide, you'll be well on your way to becoming a color matching pro. Remember, practice is key – so keep refining your skills and experimenting with different images and settings. Happy editing!
Questions you might be asking
How do I match the same color in Photoshop?
Matching colors in Photoshop is an easy process that involves using the Eyedropper tool. First, select the layer that has the color you want to match. Then, select the Eyedropper tool and click on the color you want to match. Next, select the layer you want to apply the color to and use the Paint Bucket tool to fill it with the selected color.
How do you sync colors in Photoshop?
Syncing colors in Photoshop means making sure that the colors in your design are consistent across multiple layers or documents. To do this, you can use the Eyedropper tool to select a color and then use the Paint Bucket tool to apply it to other layers or documents. You can also use the Color Picker tool to select the same exact color values and apply them to your design.
How do I copy exact colors in Photoshop?
To copy exact colors in Photoshop, you can use the Color Picker tool. First, select the layer that has the color you want to copy. Then, choose the Color Picker tool and click on the color to select it. This will bring up the Color Picker window where you can find the exact color values. Once you have the color values, you can apply them to other layers or documents using the Paint Bucket tool or the Eyedropper tool.
How do you match colors?
Matching colors involves finding the right balance between saturation, hue, and lightness. In Photoshop, you can use the Eyedropper tool to select a color and then adjust its values using the Color Picker tool. You can also use adjustment layers such as Hue/Saturation or Color Balance to match colors between different layers or documents. Another way to match colors is to use color swatches or color libraries to ensure that your colors are consistent throughout your design.