Adobe Audition is a leading digital audio workstation used by audio professionals and enthusiasts alike. One of the many strengths of Adobe Audition is its extensive range of supported file formats for exporting your audio. Today, we're going to guide you on how to export your Adobe Audition files to WAV format. WAV, or Waveform Audio File Format, is a popular, uncompressed file format that retains the maximum audio quality.

Why Export to WAV?
Before we dive into the steps, let's briefly discuss why you might want to export your file as a WAV. As a lossless audio format, WAV preserves audio quality without any compression. This makes it an excellent choice for archiving your work or for scenarios where the highest quality audio is required.
Now, let's jump into the process.
Step 1: Open Your Adobe Audition Project
Start by opening Adobe Audition and loading the project you want to export. If you've been working on a project already, you can continue from there.
Step 2: Choose the File to Export
If you are working on a multitrack session and you want to export a specific track as a WAV file, you first need to solo the track. Click on the S button on the track controls panel. This isolates the track and mutes all other tracks.
If you want to export the whole session with all the tracks mixed down to a single file, there's no need to solo any track.
Step 3: Exporting the File
Go to File > Export > File. This will open the Export File dialog box.
Step 4: Setting the Export Options
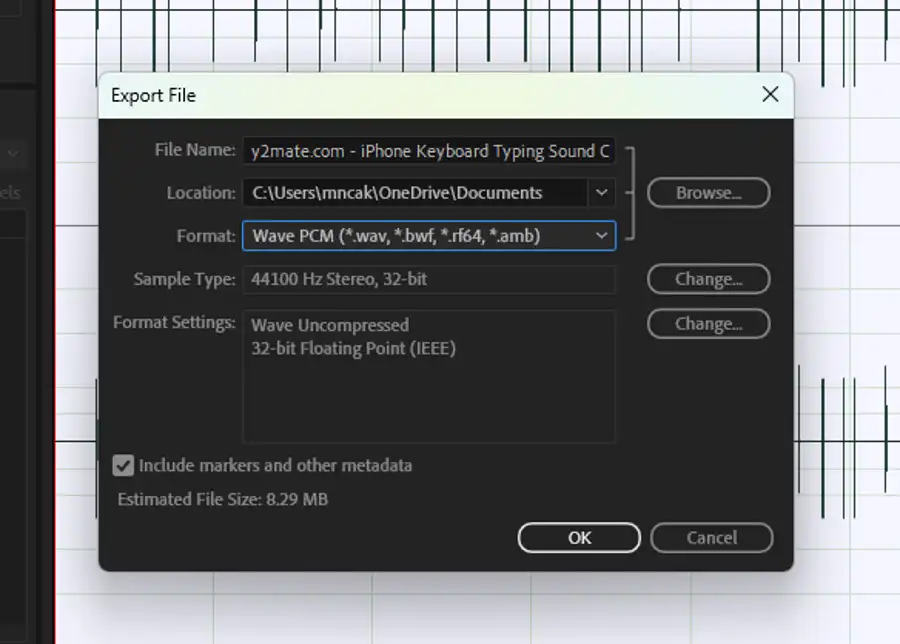
In the dialog box, you will have to set a few options:
- Location: Click on the
Browsebutton to choose where you want to save your file. - File Name: Enter your desired file name in the
File Namefield. - Format: In the
Save as typedropdown, chooseWAV (Microsoft) (*.wav). - Sample Type: Click on the
Sample Typebutton to open a dialog where you can set the sample rate, bit depth, and channels (mono, stereo, 5.1). For maximum quality, you can choose a sample rate of 44100 Hz or 48000 Hz, a bit depth of 16, 24, or 32, and stereo channels. - Metadata: Click on the
Metadatabutton if you want to add metadata like author name, copyright, etc.
Once you've set these options, click OK.
Step 5: Review the Exported File
Navigate to the location where you exported the file and open it with any audio player that supports WAV files to review the quality.
Wrapping Up
And there you have it - your audio file has been successfully exported to WAV format using Adobe Audition. Remember, WAV is an uncompressed format, so file sizes can be large. If you need a more compact file size for distribution, consider exporting to a compressed format like MP3 or AAC. However, for the ultimate in audio fidelity, you can't beat the lossless quality of WAV. Happy editing!
Questions you might be asking
How do I Export a multitrack WAV File from Adobe Audition?
To export a multitrack WAV file from Adobe Audition, go to the File menu and select Export > Multitrack Mixdown > Entire Session. In the Export Settings dialog box, choose "WAV (Microsoft)" from the Format dropdown menu and adjust the other settings as desired. Then click "Export" to save the multitrack WAV file.
How do I convert m4a to WAV in Adobe Audition?
To convert m4a files to WAV in Adobe Audition, open the m4a file in Audition and go to File > Export > File. In the Export Audio dialog box, choose the WAV format from the Format dropdown menu and adjust other settings as desired. Then click "Export" to convert and save the file in WAV format.
How do I Export audio from Audition?
To export audio from Adobe Audition, open the file you want to export and then go to File > Export > File. In the Export Audio dialog box, choose the desired format from the Format dropdown menu (such as WAV, MP3, etc.) and adjust other settings as needed. Then click "Export" to save the audio file in the selected format.
How do I convert mp4 to WAV in Adobe Audition?
To convert mp4 files to WAV in Adobe Audition, open the mp4 file in Audition and go to File > Export > File. In the Export Audio dialog box, choose the WAV format from the Format dropdown menu and adjust other settings as desired. Then click "Export" to convert and save the file in WAV format.
