
There's no denying the profound impact Adobe Photoshop has had on the graphic design world. From basic image edits to complex graphic designs, Photoshop is a one-stop solution for all yousr creative needs. One of the most common tasks people perform in Photoshop is resizing an image. However, if not done properly, resizing can often lead to a loss of image quality.

If you've been grappling with maintaining your image quality while resizing in Photoshop, you're at the right place. This comprehensive guide will break down the process into easy-to-follow steps, so that you can resize any image without losing its quality.

Understanding Image Resolution
Before we delve into the process of resizing, it’s crucial to understand the concept of image resolution. The quality of an image is largely determined by its resolution, which is defined by the number of pixels per inch (PPI). A higher PPI will result in a sharper image because it contains more detail.
However, the PPI also determines the size of the image. For instance, an image meant for the web may have a resolution of 72 PPI, while an image meant for print might require a resolution of 300 PPI or more. Hence, it’s essential to know your image’s purpose before you start resizing.
Steps to Resize an Image in Photoshop Without Losing Quality
Now let's dive into the actual process. Follow these step-by-step instructions to resize your images without compromising on quality:
Step 1: Open the Image in Photoshop
Open Photoshop on your computer and navigate to "File" > "Open". Locate the image file you want to resize and click "Open".
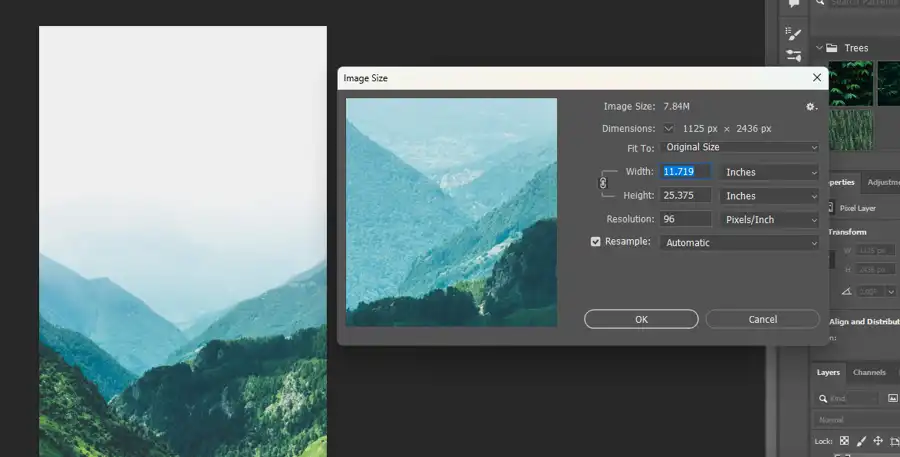
Step 2: Check the Current Resolution
To view the current resolution of your image, go to "Image" > "Image Size". A dialogue box will pop up, showing the dimensions and resolution of your image.
Step 3: Resample Image
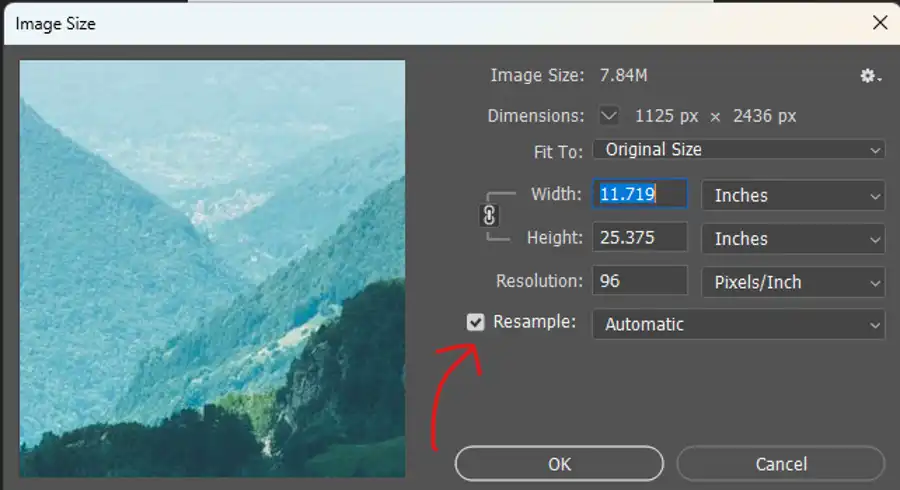
In the "Image Size" dialogue box, you'll see an option that says "Resample". Check this box. Resampling allows Photoshop to add or subtract pixels from your image during the resizing process to maintain the image quality.
Step 4: Choose the Right Resampling Method
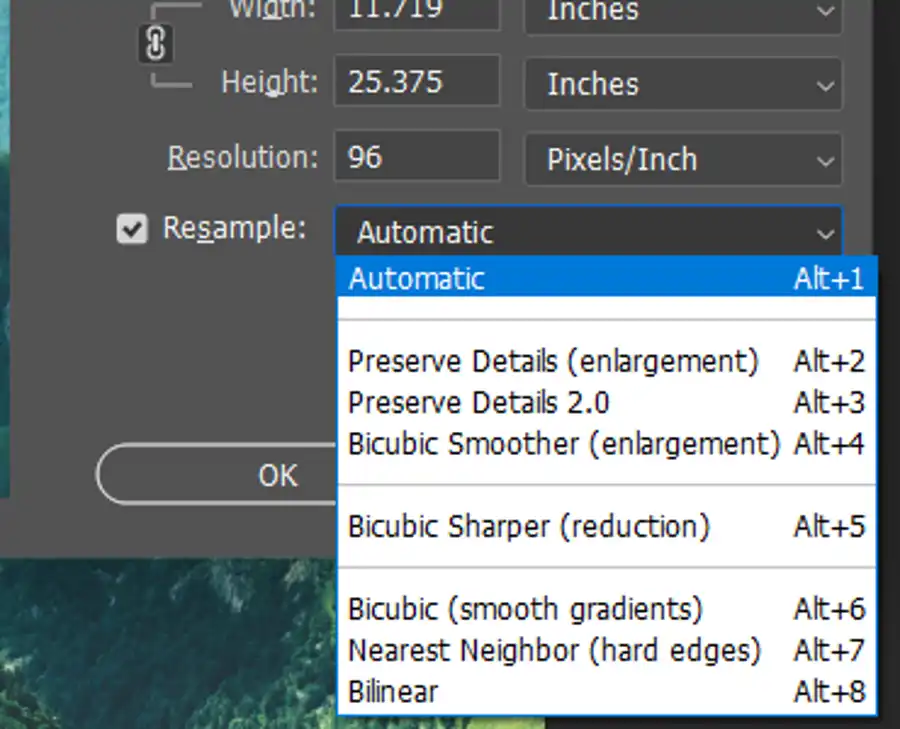
Just below the "Resample" checkbox, there's a dropdown menu with various resampling options. Each method is useful for different kinds of image modifications:
- Preserve Details (enlargement): Best for increasing the size of your image.
- Bicubic Smoother (enlargement): Also useful for enlarging an image, but may result in a softer image.
- Bicubic Sharper (reduction): Best for reducing the size of your image.
- Bicubic (smooth gradients): Ideal when the image size is not significantly changed or when the image has lots of smooth gradients.
For most general purposes, "Automatic" will work fine, as Photoshop will decide the best method for you. But if you want more control, you can choose one of these manually.

Step 5: Adjust the Dimensions
Now, input your desired image dimensions in the Width and Height fields. If you're resizing for a specific platform, make sure to check their recommended image dimensions. For example, a Facebook cover photo should ideally be 820x312 pixels.
Step 6: Adjust the Resolution
After setting the dimensions, it's time to set the resolution. Remember, a higher resolution will mean a better quality image but a larger file size.
- For web use, stick to 72 PPI.
- For print, use a minimum of 300 PPI.
If you're not sure, go with a higher resolution - you can always reduce it later.
Step 7: Save
Your Image
Once you're satisfied with your new dimensions and resolution, click "OK". Your image will be resized in the workspace. To save your resized image, go to "File" > "Save As", choose your desired format and location, and click "Save".
Final Thoughts
Resizing an image in Photoshop without losing quality can seem like a daunting task, especially for beginners. However, with the right knowledge and practice, it can become second nature. Remember, the key is to understand your image's purpose, whether it's for print or web, and to choose the right resolution and resampling method accordingly. Photoshop is a powerful tool with a vast array of features at your disposal, so don't be afraid to experiment and find the best methods that work for you.
Questions you might be asking
How do I change the size of an image in Photoshop without losing quality?
To change the size of an image in Photoshop without losing quality, follow these steps:
- Open the image in Photoshop
- Go to Image > Image Size
- Make sure the "Resample Image" box is unchecked
- Change either the width or height to the desired size
- Make sure the "Constrain Proportions" box is checked to maintain the aspect ratio
- Click "OK" to apply the changes
Can you resize an image without losing quality?
Yes, you can resize an image without losing quality, as long as you use the proper technique. When you resize an image, the number of pixels changes, which can result in a loss of quality. However, if you use a technique called "non-destructive resizing," you can minimize the loss of quality. This involves using software that can resize an image without actually changing the number of pixels.
How to resize an image in Photoshop without losing quality ShortCut?
To resize an image in Photoshop without losing quality using a shortcut, follow these steps:
- Hold down the "Alt" key (Windows) or "Option" key (Mac)
- Go to Image > Image Size
- Change either the width or height to the desired size
- Make sure the "Constrain Proportions" box is checked to maintain the aspect ratio
- Release the "Alt" or "Option" key
- Click "OK" to apply the changes without losing quality.